
Essential Guide to Vapor Barrier Installation for Moisture Control
Understanding Vapor Barrier Installation
What is a Vapor Barrier?
A vapor barrier is a material designed to impede the movement of moisture through walls, floors, and ceilings of a structure. Typically made from polyethylene plastic or foil, vapor barriers are used in homes and buildings—especially in crawl spaces and basements—to protect against excess moisture that can lead to mold growth, wood rot, and other structural damage. During the Vapor Barrier Installation, it creates a continuous barrier against water vapor, ensuring a healthier indoor environment.
Benefits of Vapor Barrier Installation
The installation of a vapor barrier provides numerous benefits. Firstly, it significantly reduces humidity levels, which can help prevent mold and mildew growth, essential for maintaining good air quality, especially in areas with high moisture. Secondly, a vapor barrier helps protect wooden structures from rot and pests by keeping moisture at bay. Additionally, it improves energy efficiency in the home, as less energy is needed for heating or cooling when moisture levels are regulated. Finally, a properly installed vapor barrier enhances the life span of HVAC systems by preventing excess moisture from passing into ducts and causing inefficiencies.
Common Installation Materials
When installing a vapor barrier, several materials are commonly used. The most popular is polyethylene sheeting, typically available in thicknesses of 6 to 20 mils. Thicker materials tend to be more effective in preventing vapor diffusion. Another material that may be used is foil-faced insulation, which serves a dual purpose—insulating as well as preventing vapor movement. Finally, adhesives, tape, and sealants play vital roles in securing the barrier and ensuring airtight seals around edges, seams, and penetrations.
Preparing for Vapor Barrier Installation
Assessing Your Crawl Space
Before installing a vapor barrier, it’s crucial to evaluate the crawl space thoroughly. Look for sources of moisture, such as leaks from pipes or exterior drainage issues. You must also check for existing moisture levels, which can be done using a moisture meter. Observing the type of soil and vegetation around your home will provide insights into potential water infiltration pathways. A clean, dry, and well-ventilated crawl space is the ideal condition for a successful vapor barrier installation.
Necessary Tools and Materials
Proper tool preparation is essential for an effective installation. Required tools typically include utility knives or scissors for cutting the vapor barrier to the desired size, measuring tape for accurate measurements, and a roller or brush for applying sealant. Additionally, protective gear, such as gloves and masks, is advisable to ensure safety during installation. Having adhesive or tape readily in hand will facilitate a smooth sealing process for the vapor barrier.
Safety Precautions Before Installation
Venturing into a crawl space can pose various safety risks, including exposure to hazardous materials or potentially harmful pests. It’s essential to wear proper protective equipment, including gloves and respirators. Moreover, ensuring that the area is well-ventilated will help mitigate potential health risks. Inspecting for hazardous materials like asbestos before commencing work is crucial, and if found, professional help should be sought to ensure safe handling.
Steps for Effective Vapor Barrier Installation
Removing Existing Moisture
Before laying down the vapor barrier, it is essential to remove existing moisture. This can involve using dehumidifiers or fans to reduce humidity levels drastically. In cases of significant water issues, solutions might require addressing drainage systems, sealing any cracks, or diverting surface water away from the foundation. It is vital to ensure the space is dry before placing the vapor barrier to avoid trapping moisture, which can lead to further complications.
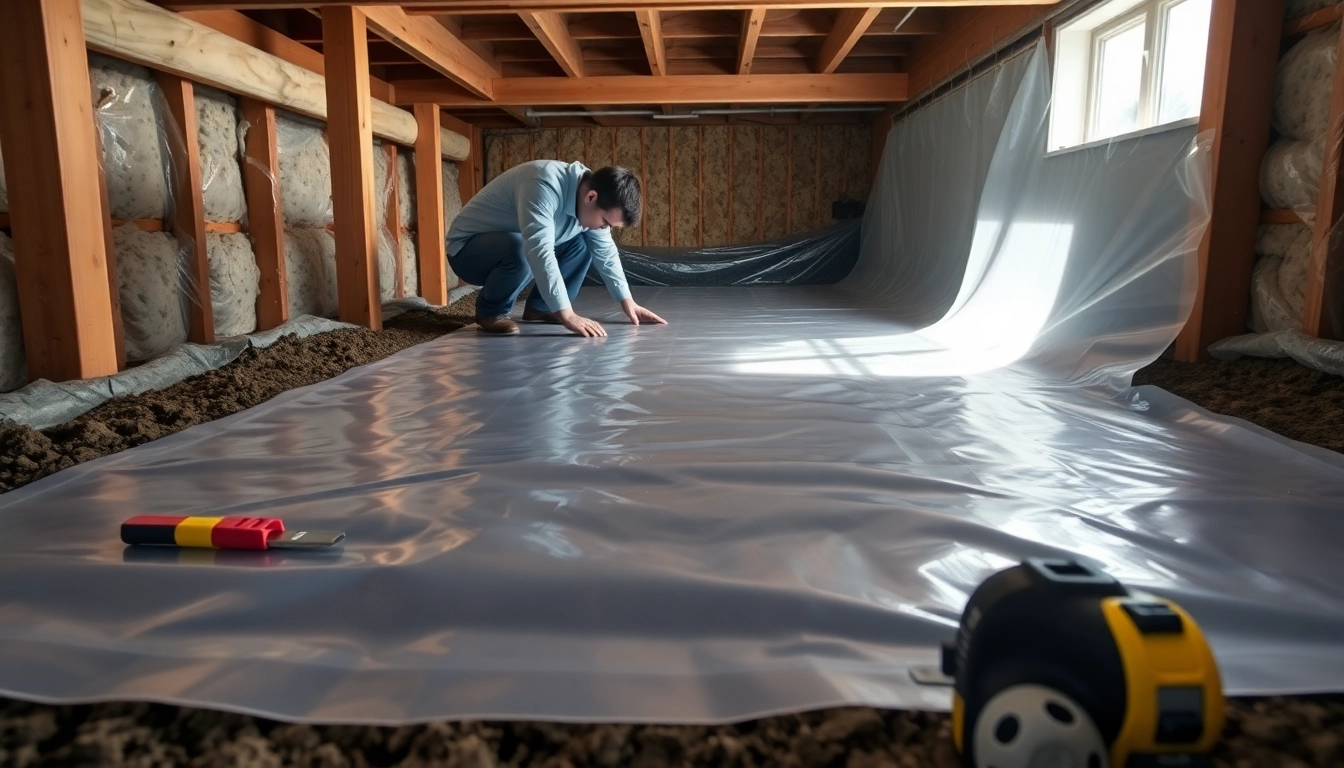
Installing the Vapor Barrier
Begin by measuring the dimensions of your crawl space to cut the vapor barrier material accordingly. Lay the barrier flat on the ground, overlapping seams by at least 12 inches. The barrier should be extended up the walls of the crawl space by a minimum of 6 inches. Once in place, secure the edges and seams with tape or sealant to ensure a complete seal. It is crucial to check for any punctures or tears in the material and address them appropriately before completion.
Sealing and Insulating for Best Results
After the vapor barrier is installed, sealing and insulating play a critical role in maximizing its effectiveness. Use waterproof caulking or spray foam to seal any gaps where the barrier meets the walls or to fill in any punctures. Proper insulation of the crawl space helps maintain a consistent temperature, minimizing condensation. Insulating the wall above the vapor barrier can enhance energy efficiency, particularly in cold climates.
Maintaining Your Vapor Barrier
Regular Inspection Protocol
Once installed, a vapor barrier requires regular inspections to ensure it remains effective. Schedule inspections at least once a year or more frequently in areas with high humidity. During these inspections, look for signs of damage, water infiltration, or deterioration in the barrier. Any visible discolorations, tears, or mold growth should be addressed immediately to maintain the integrity of the infrastructure.
Repairing Damage to the Barrier
If you discover damage, it’s essential to repair it promptly. For minor tears, use a similar patch material and seal it with appropriate tape. Larger holes may require cutting out the damaged section and replacing it with a new piece of vapor barrier material, ensuring it is correctly overlapped and sealed. Regular maintenance and timely repairs ensure the barrier continues to work effectively for years.
Signs You Need a Replacement
Over time, even the best-installed vapor barriers may require replacement. Signs indicating a necessary replacement include persistent mold growth despite repairs, noticeable tears or punctures that cannot be effectively repaired, and high humidity levels in the crawl space even after dehumidification efforts. If the carcinogenic materials are involved, it’s essential to consult with professionals to comply with safety regulations in your area.
FAQs on Vapor Barrier Installation
What is the purpose of a vapor barrier?
The purpose of a vapor barrier is to prevent moisture from entering spaces, thereby reducing humidity and protecting structural elements from damage like mold and rot.
How long does a vapor barrier last?
A vapor barrier can last anywhere from 10 to 30 years, depending on the material quality, installation, and environmental conditions in the surrounding area.
Can I install a vapor barrier myself?
Yes, homeowners can install a vapor barrier themselves by following manufacturer guidelines and taking proper safety precautions, although professional installation is recommended for optimal results.
What thickness should a vapor barrier be?
Most experts recommend using a vapor barrier with a thickness of at least 6 mils for residential installations, with thicker options providing better durability and performance.
Are vapor barriers necessary in all climates?
Vapor barriers are not necessary in all climates. They are particularly important in humid climates or where moisture problems are prevalent. In drier climates, their necessity may be reduced.